Hello, I'm ivanryan1, I wrote a guide for Ogdoadic about a year ago now, and felt the need to make a new one with the release of Mitsurugi, entirely focused on that build of the deck, as any other build is so much worse than it.
Ogdoadic is a Reptile deck which plays entirely out of the graveyard, which has an ability to efficiently make Rank 4 Xyzs and a lot of link material as well as tribute its own monsters. This pairs really well with Mitsurugi, a Reptile Ritual deck which likes to be tributed and makes Rank 4s.
This combination makes for a high power and grindy Link combo deck which can play well into the Mulcharmies and pushes really well into fields.
- Engine
- Techs and Non Engine
- Tertiary Engines
- Notes/Lists
- Combos
- Combos Through HTS
Ogdoadic Engine
Main Starters
The Remnants are the main starters and extenders within Ogdoadic, they both send themselves from hand to the graveyard to send a Reptile of their opposing atribute to the graveyard.
-
Loading... 's main targets are Loading... and Loading... (We'll cover why later). It can also send any of the Mitsurugis to the graveyard, though you'll only do that in specific hands. The number of Nunus you play will depend on how many of it's main targets you play.
-
Nunu's unique effect makes it just a free special summon, but while on field it locks you into Reptiles. You'll mainly be using it as one half of Loading... . You should be leading Nunu's hand effect in most combos, as it's the least important to resolve as you'll always be getting it on field for free.
-
Loading... 's main target's are Loading... and Nunu
-
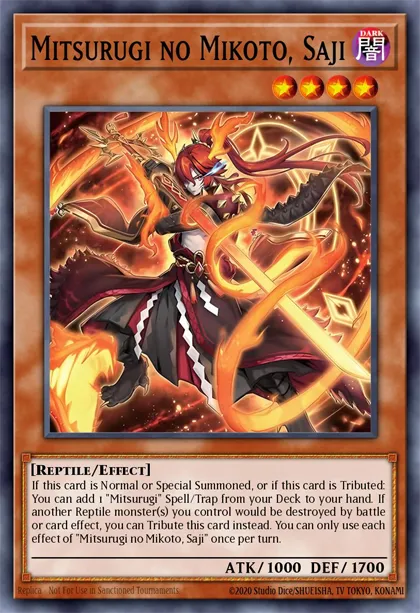
Nauya's unique effect search's one of Ogdoadic Spell/Traps, this effect is important to all of your combos. You'll be typically be special summoning Nauya from the GY, but it can be just used as your normal summon.
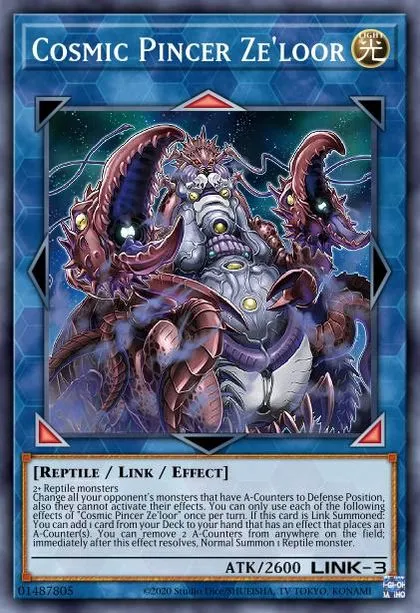
The Engine "Bricks"

Loading... is the most important of these cards. Through Nauya sending it to the GY, it can tribute a monster you control then summon back Nauya, allowing you to get 2 bodies and Nauya's Spell/Trap search.
- Keurse allowing your opponent to special summon is almost never bad for you, especially when you're going first, it can actually really help you by turning on cards that need your opponent to control a monster.
Loading... is mainly for making Nunu into a 1 card Loading... by just sending another card in your hand to the GY. I'd recommend leading Zohah's add back, then special summon Nunu, and then normal summon Zohah to play around Bystials.
- Zohah also has other utility as well, it can get cards like Keurse out of your hand and into the GY. By linking it off you can also get the search for an Ogdoadic, you'll want to do this mainly when going second and summoning a Link monster which has an on summon effect to chain block it.
Loading... main use is as an extender through interruption as the lock it has on it's effect to summon itself is very harsh, locking for 2 turns, so even cards that would normally get around a lock by summoning on the opponent's turn don't work.
- To use it going first without locking yourself you can revive it with another card, then use Nephilabyss's on field effect to reborn anything, not just Reptiles.
Loading... is a card which mainly increases your ceiling for your going first combos.
-
Because it's level 8 you can use it as the entire tribute for a Mitsurugi, the vast majority of the time you'll be using it as the material for Loading... to summon from deck. Aron having the tribute effect let's you trigger your Mitsurugi Ritual monsters tribute effects without using a Mitsurugi card. How this works out is that you'll ritual summon from hand with Loading... , add back it back with Loading... , ritual summon from deck using Aron as the material, then summon Aron from the GY by tributing both Ritual monstes, triggering both of their effects to add and special summon themselves back.
-
Aron also helps you play into Loading... and Mulcharmies by hand ripping a card after they draw, basically giving you a free summon into these types of cards. You can also hand rip by using Zohah's search effect while Aron is on field as Zohah's effect makes your opponent draw and discard and then Aron will get to randomly hit one after, putting them down one card. The hand rip also just has great synergy with Loading... , which together make it so your opponent esentially has 2 less cards to work with.
-
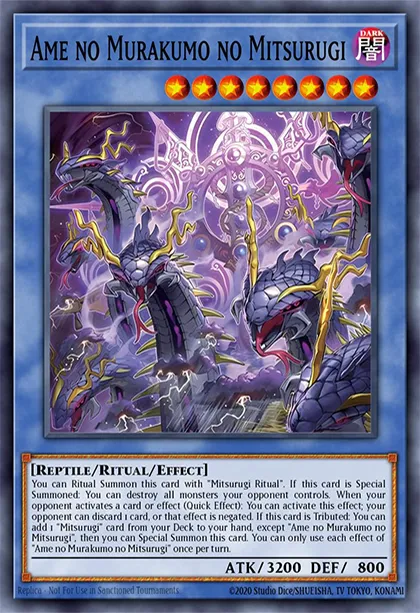
Aron's add from deck or GY is maybe the least important of its effects but is still very helpful, notably the text of Aron is different in the TCG than in the OCG, in Master Duel Aron shows the TCG text which doesn't say it has to be by card effect (MDM shows the OCG text of the card). This makes is trigger much less often than in the TCG. Aron will mainly get it's search off of Murakumo's board wipe, you can even get it off on the first turn if your opponent summons a monster (or you give them a monster).
The Spells
Loading... is the main target for Loading... 's search, for every 2 levels of the monster you tribute you get 1 token, so if you tribute a level 8, you get 4, which lets make whatever Link endboard you want.
-
Daybreak is very strong to open going second as you get to dodge removal and targeted negation on your monsters, most notably the Mitsurugi rituals, which Daybreak also triggers their search effects at the same time.
-
The GY effect is also very critical to all of your combos and your grind game. The best sends off of Daybreak are contextual, but the main sends are Loading... , Loading... or Loading... , as just extenders, Loading... if you need ceiling or Loading... or Loading... if you want Mitsurugi access.
Daybreak is unfortunately not a starter, so despite how good it is to open I'd advise playing 3 unless you're on 60, you just want to avoid drawing 2 in the same hand.
Loading... is your secondary target for Nauya, unfortunately it is also not a starter just an extender, but a good one at that.
-
If you don't don't meet Water Lily threshold for the reborn you'll mainly just be sending Loading... if you need an extra level 4 for Loading... or the monster you were going to send to the GY with one of your effects (Ex. Nauya's send gets negated, so you send Keurse with Water Lily).
-
To meet Water Lily's threshold you only need 4 Reptiles with different names in GY, Water Lily will send the fifth then check the count, letting you special from GY. If you need Mitsurugi engine you can special Aramasa or Saji or just if need more bodies you can send Nephilabyss, which will be able to reborn anything. You can also send Night Sword Serpent and then special another monster and get the special summon trigger, so you can even use it to chain block.
Lesser used cards
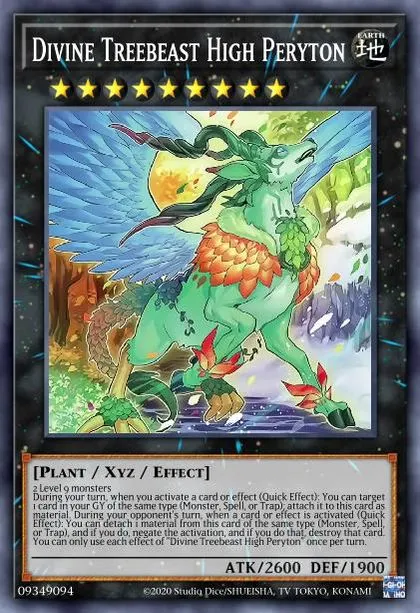
Loading... is just often too difficult to get in rotation with everything else mainly due to it's awkward level. It makes it useless with Loading... , so you either have to send it with Ogdoadic effects, which rely on you having the extension already, or adding it with Loading... and then discarding it, which forces the combo to be done in a specific order. It requiring three tributes can also cut you off of an I:P on the endboard while trying to get extra tribute triggers from the Mitsurugi Rituals. You can summon it off Futsu, A Bao A Qu and Nephilabyss without tributing however.
The effect it has is very powerful however, a second board wipe is tough for decks to play through, however, it is double sided, so it also sends your monsters, which makes it awkward when ending on cards like I:P and A Bao A Qu.
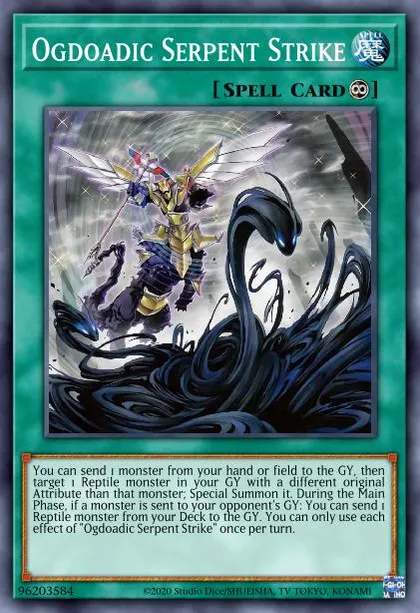
Loading... is just overshadowed by Daybreak and Water Lily, it's just tough to find a scenario in which Serpent Strike is better than those 2. It really is only better in scenarios in which you can set up Loading... into a Maxx "C" or Mulcharmy where you want to send the Reptile you want and revive on the opponent's turn when you are no longer under it.
Cards that don't make the cut


Loading... 's revive effect is entirely fulfilled by Loading... , making it really only useful as an addtional disruption, but that disruption is very telegraphed. Pretty much, it's just worse than Loading... .
Loading... has a good effect which can be incredibly impactful, as well as an additional way to tribute the Mitsurugi Rituals, the problem, is that you only have one search for an Ogdoadic Spell/Trap, and Loading... is already a priority to search, and only being able to search this when you already have Daybreak or playing into a Mulcharmy just makes it not worth the deck slot, especially for a trap card. If there was a second Spell/Trap searcher, then it could be justified.
The rest of these cards are just bad.
Loading... is just useless, you'll never send it with Nauya over Keurse or Nunu unless you have Keurse in hand. It's 2nd effect also just does nothing.
Loading... has a very mediocre effect to help grind game, while giving your opponent cards back to their hand, which is just not an equal exchange.
You can just read the last two to know they are not good.
Mitsurugi Engine
I have less to say about the Mitsurugi part of this deck because I assume you know these cards better.
Non-Ritual Monsters


Loading... is a fine normal summon, though plays into Droll, the number of Aramasa you play really depends on how much you prioritize starting with Mitsurugi.
Loading... isn't a starter normally (with a specific build of your extra deck it can be) but its Spell/Trap search is really important to resolve. You can chain block the search by tributing it with Keurse and using the revive as chain link 2. You can also do this with Aramasa, but the effect is less important to resolve.
Loading... is the brick, you'll be adding Loading... the majority of the time. There are some neat plays you can do by sending your Ritual monsters with Nunu and other foolish effects to add them back, but it's not something you'll do often.
Make sure to keep in mind the protection effects of the level 4s to revive them with Futsu on your opponent's turn to protect your board or to protect your Link monsters or Rituals going second.
Loading... provides really nice removal to get off of your monster searches as well as a to trigger the Ritual monsters search effects without using a spell. The lock really isn't very impactful going second, the Reptile type extra deck monsters have a lot of good effects for playing into a board.
Ritual Monsters


Loading... is of course a great starter and extender.
Loading... is the main win con of Mitsurugi, you'll only ever need one because even if it gets banished Loading... can return it to the deck. Its handrip has good synergy with Aron's handrip, increasing the odds of hitting a good card.
There's no reason to not play Loading... as you can easily trigger it's search with the extra ways you have of tributing with the Ogdoadic cards, as well you just have more good cards to revive off it. As well, your opponent choosing to summon off of Keurse will trigger Futsu's revive.
Spell/Traps
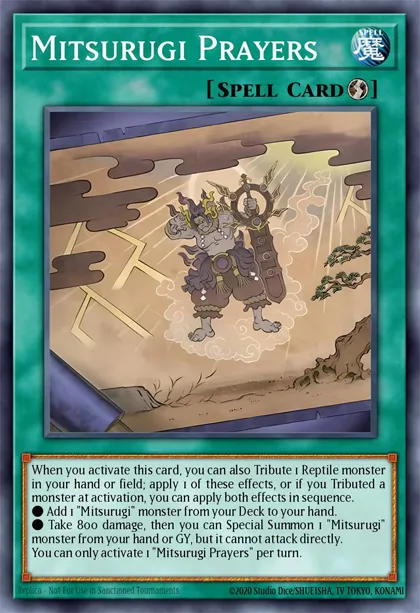


Opening one of either Loading... or Loading... is important for playing through Saji's search being negated, which is this deck's only real chokepoint that isn't easy to extend through without already opening a target.
- You'll mostly be sending Loading... and Loading... from deck off of Ritual from hand, if you haven't used Saji's search, sending it and Kusanagi to get Ritual back and Prayers is powerful. Sending Nunu if you've already used Night Sword Serpent is fine, though it can be hard to summon if you've gone through the easy to summon Ogdoadics already in the turn.
Loading... is mostly for Loading... , searching for Mirror is pretty uncommon in a lot of combos (at least in how I build my combos) but can be useful to force a ritual summon through going second if Mitsurugi Ritual doesn't work out.
You can either run one of either or both Loading... and Loading... .
-
Magatama is generally a better draw than Purification going second and it's more flexible as a card, either being destruction or another way to ritual summon.
-
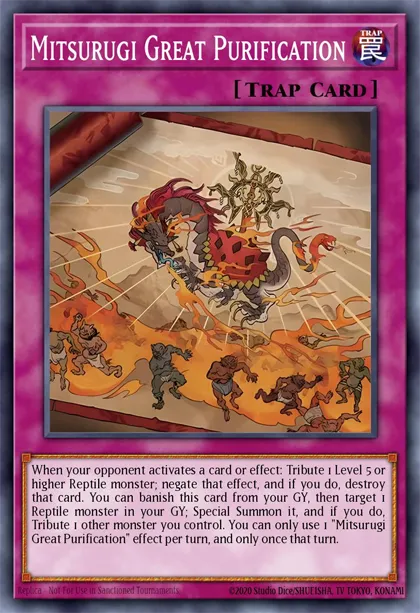
Purifcation's omni negate is really powerful, especially in bo1, and it's not awful to draw, it can be discarded off of your engine cards like Loading... and Loading... . Its graveyard effect is also really good for dodging removal and negation to then trigger your rituals and get unused on summon effects.
-
Running both does put two mediocre draws in your deck but not only improves your full combo but also your half boards as well as have the flexibility. If you run closer to forty it's hard to justify playing both due to wanting more non-engine, if your deck is fifty cards and up you likely should play both.
Your search priority will typically be Prayers > Ritual > Second Prayers > Purification/Magatama > Mirror. Sometimes you'll want to search Purification for your half board into Maxx "C" or Mulcharmy Fuwalos.
Cards that don't make the cut

The grind game and protection provided off of Loading... just isn't needed, and your searches has too many targets that you'd rather have.
Loading... is a really bad brick that is just win more, though also most of the time worse than an omni.
Generic Engine Cards


Loading... is your strongest Mitsurugi starter as long as your opponent doesn't have Droll. You should be leading it as handtrap bait because its pretty easy to play through it getting negated as long as you have any other starter.
Loading... is the strongest card in the deck, it lets you play through handtraps by itself.
-
Going first if you play Zohah, you'll want to send Zohah, Nunu, Nauya and Keurse, this will give you 2 pushes for combo, first by getting both Zohah and Nunu on field to make Loading... to threaten to search Habakiri, then if that gets negated you can special Keurse and Nauya from the GY, search Daybreak and still do full combo. You can also do this double push if you draw a Level 4, in which case you'll send Nephilabyss.
-
Going second you probably won't want to send Zohah as you'll want the cards in your hand to break the board, you'll still be sending Nauya and Keuse almost always unless you drew one of them. Sending Nephilabyss can get you a really strong push from the GY, by sending a Mitsurugi you can threaten that engine, as Nephilaybss will be able to revive it. Night Sword Serpent or Nunu will probably be your fourth send in most situations, just having more bodies is good.
Loading... is pretty critical to almost every combo and your ability to play through Nibiru. It's actually not that bad to draw as you have ways to put it back into the deck with Daybreak, so you still get to trigger the effect.
Loading... is pretty much just extra copies of Aramasa, the combo off of Lamia is slightly better than Aramasa since you don't use that search to start as well its protection effect can be sometimes set up, its best target being Futsu. If you're in need of additional consistency it is a reasonable option.
Loading... is a searchable extender with a nice on summon effect. It is just good extension and it's full combo even if it has a target and it can find you lethal through sticky boards. A big negative of this card is that it's level 3, not 4, so it can't be used as material for King of the Feral Imps
Other options


If you don't like Loading... , Loading... can be a good alternative, it has an easy summon condition, is level 4 and has a nice removal effect (that cannot target Reptiles, Insects or Plants, so it can't get rid of opposing Mitsurugis). It does lack the foolish effect that Black Mamba has, so it can't get you the extra extension.
Loading... is an alternative to Armored Lizard, it doesn't need GY set up for the effect and is a tuner for synchro lines, though doesn't have a removal effect and can't extend off of an empty board.
Loading... can be a really strong extender and board breaker when playing against decks which end on a field spell, but if your opponent doesn't have one, I.A.S. doesn't do anything, so it's very risky to run with no side deck.
Loading... is a unique board breaker that is easily searchable through the many ways of sending a reptile to the GY.
-
The weird summon condition is sometimes not live when you need it, the effect of the monster needs to respond, so Ash Blossom makes Eto live, but not Maxx "C". Most of the time it will be live going second though.
-
The body isn't completely useless after you use it to attack over something as you can still tribute it for Ritual summons and Ogdoadic effects.
Eto does require your battle phase and is weak to Spell/Traps, it's nice when playing into a Fiendsmith deck to attack over Wave High King Caesar or a Desirae not equiped with Agnumday. It's not good in a meta which has a significant amount of good backrow or monsters that are not weak to battle.
Extra Deck
Engine Bridges
Loading... (KOTFI) is critical to almost every combo, it's the best way to bridge Ogdoadic and Mitsurugi together. Builds that play a larger Ogdoadic engine will want to play two KOTFI as you will want both more often. You can play just one if you're only planning to search Nauya or Habakiri with the card.
When you are going seond Loading... functions as an easier to make KOTFI, being able to be made with a Reptile and any other monster, just keep in mind it's lock on the search effect.
-
Echidna makes hand traps which summon themselves much less impactful by letting you just get a free search. If for example you are Nibiru'd on resolution of Loading... , as long as you have a banished Reptile you could use the GY effect of Daybreak to send Loading... to the GY to summon it, and then make Echidna, put Nibiru to 0, then search for any Reptile you want.
-
Putting a Monster can allow for easy OTK lines through monsters that can't be destroyed by battle as well it can act as removal if you give up your battle phase.
-
Importantly Echidna adds Reptiles up to the number of 0 ATK monsters your opponent controls. Against certain decks which happen to summon a 0 ATK monster, Ehidna can get a ton of Value. There is also several ATK reduction effects that you can leverage, Loading... 's reduction makes it so that every monster your opponent with 800 or less ATK gets you a search and with Loading... by banishing a 0 ATK monster you can get an extra search.
Alternative Bridges


By just sending the Reptile you want to the GY, you can easily revive it with Loading... .
-
A Bao is most easily gotten to through through the Ogdoadic engine with Daybreak, which can also get the monster you want to revive into the GY. You will need a Fiend to make it however, you can use a Knightmare like Loading... or a Fiend Link that can be made with just the tokens like Loading... .
-
A Bao also serves as an effective endboard piece, either for popping or as an additional way to revive Murakumo.
Loading... is another way to revive a Reptile, Dugares is most effective as a Bridge from the Mitsurugi side, you can send Nauya with Loading... then revive it to search Daybreak. The other effects are of course helpful.
Utility Reptile Links

Loading... is useful for banishing Reptiles for Loading... and getting a free draw. By banishing a brick you drew that you want in deck like Loading... or Loading... you can put them back into the deck. It can't be made with just tokens unfortunately so you'll need to use a non token or make a token into Loading... .
Loading... is good backrow removal usable under a Reptile lock. It's revive effect makes it hard for the opponent to stop you from outing their backrow and lets you put back Reptile extra deck monsters to use them again later or put them back in the main to not run out of targets for Mitsurugi search effects and cards like Water Lily.
Loading... is a really great board breaking and OTK tool.
-
It combines well with Loading... as it checks original ATK, not current, so you get to attack for massive amounts of damage, even sometimes for lethal if the opponent's big monsters are close enough. It is also a towers out, as it will be always at least 100 attack bigger.
-
The effect negation is hard to play around and the vast, vast majority of players will not think about it. Often it will only negate one or two monsters as by the time you get to making a Link 3, they'll have used most of their interactions.
-
Gorgon can also be used as an endboard piece. Of course it can be summoned off of I:P on the opponent's turn, but you can also make it on your turn, link it off, then revive it to the middle zone, negating both EMZs.
Endboard Pieces

Loading... is the most common extra deck card to end on. You can make either Loading... or Loading... as interruptions, S:P being a second interaction and Dyna Mondo being an extra way to revive Ritual monsters.
Loading... is a lingering floodgate for hand effects which is really easy to make. It's effect can be pretty useless against certain decks while almost soloing others, though it's mainly played because it's one the few Reptile extra deck monsters which does something on the opponent's turn without extra set up or that can be easily played around.
Loading... is a very powerful floodgate when set up.
-
Zer'oll adds Loading... , which tributes an Alien to put an A-Counter on every monster the opponent summons. You can easily get an Alien on your board by summoning Loading... which needs any two Reptiles as material. With Planet Pollutant Virus active and Zer'oll on the board every monster your opponent summons cannot use its effect and they are also turned to defense, pretty much making the only out in engine for most decks be an over 2600 attack link monster, which is hard to come by.
-
Other end boards that this deck can make are very often good enough to win without the Zer'oll floodgate, it makes you play bad brick and 2 extra deck cards which are really only useful together.
Whether you play the package or not is up to you.
Techs
Main Deck
Thrust Package
Thrust has many good targets in engine, Loading... and Loading... being your strongest searches. The in-archetype normal trap Loading... isn't the best set going first as if you don't draw a play, it is dead, so I'd recommend a second trap target, with Loading... being the best dedicated target, also being a good discard, and Imperm being a solid draw in many situations.
Turnskips
If you are going to play handtraps, the best ones will be the "turnskips". This is because there just isn't much space to play a lot of non-engine, so you are less likely to draw 2+ hand traps together, making them less effective than in other decks which get to play more.
Quick Plays
If you are going to play board breakers you want cards that can be useful going first as well due to Maxx "C".
Droplet is pretty much the best non-normal spell breaker, being able to dodge on field negates, put cards that want to be in the GY in the GY and non targeting.
Loading... is the only board wipe in the form of a quick play, and has some aditional applications going first for beating Veiler and Imperm as well as some turn 0 plays like Loading... .
Foolish Spells
Grass can perform the same function in this deck as it does in Branded, serving as bait for Ash due to its potential advantage. Grass is not as good here however, due to the only good hits being NSS and some of the Ogdoadics so there's a good chance you'll just hit nothing.
Foolish acts as extra copies of Water Lily and like Water Lily, isn't an in-enigine one card combo, though if you have a third engine which benifits as well from Foolish, it is worth including.
Extra Deck
Utility Combo pieces
Loading... is not here for Nibiru, it is instead here to make it so that you can make Loading... with two tokens to keep your non-tokens on board. It is also nice for making S:P and Knightmares (and Co-Linking them as well).
Loading... lets you get another search off of KOTFI, which improves the 1 card combos.
Fiend Links for A Bao A Qu which can use tokens
Loading... is a Link 3 for A Bao A Qu that can be made with Haggard Lizardose and a token, it is also utility non-destruction removal for anything that can be targeted if S:P has already been used or you want to attack directly, it can also be an okay I:P target if S:P has already been summoned.
Loading... and Loading... perform the same role as they have the same material requirement, it just depends on what removal you value more, though Phoenix is typically better. Loading... also has the same summon condition, but is instead an extender and can discard cards without the opponent needing cards on the field.
Loading... can be made with any two monsters unlike the Knightmares, which need different names, so you can just use tokens for it. As well, when using Darks with different names as its material, Beat Cop gains a tribute effect, which has nice utility.
Board Breakers
Loading... is great in DARK heavy metas, and especially in the "Mirror". The best in engine targets for its float effect are Loading... , Loading... , Loading... and Loading... .
Loading... is just the best Link 4 at breaking boards and setting up for OTKs, being very easily made off of the Daybreak tokens.
Loading... is a secondary Towers out with Loading... and as an I:P target.
Loading... is the best rank 4 at forcing out fields, however it can be awkward to make with the Ogdoadic half of the deck, because the best way to make Rank 4s with it, Loading... locks into reptile while on field.
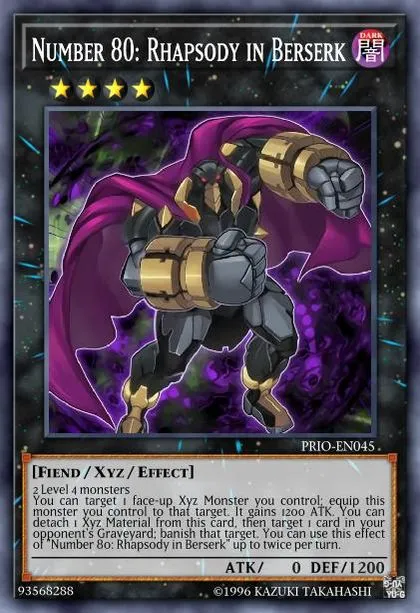
Loading... is a utility card which is great at cutting off graveyard follow-up and forcing interaction that is in the graveyard. As well Number 80 is a Fiend, so its material for A Bao A Qu
Beating Handtraps/Backup Lines

Loading... can get any Reptile to hand when used in combination with Loading... . and if it points to a reptile Summon Sorceress will give the opponent a monster and you any reptile in your deck(with it's effects negated). You can then link off the Summon Sorceress and the summoned monster for Echidna, make the opponents monster 0 Atk and get the search. Importantly giving your opponent a monster lets you summon Wousu turn 1, allowing you to get the searches off of the Ritual monsters even if you don't have access to a Mitsurugi Spell.
Loading... is also an okay endboard peice, but mainly protects your Mitsurugi combo from Impulse and Ash. It can be awkward to make live if you play a low spell count however.
Loading... allows you to do a Ritual summon, allowing you to get out your Ritual monsters if Mitsurugi Ritual gets negated.
Endboard pieces
Loading... is a good I:P target and endboard card while under the effect of Loading... , when its difficult to access Prayers, solid removal, an additional way to revive Rituals and a way to recycle them.
Loading... can get Nibiru as an interaction.
Loading... can be made with Loading... and Loading... .
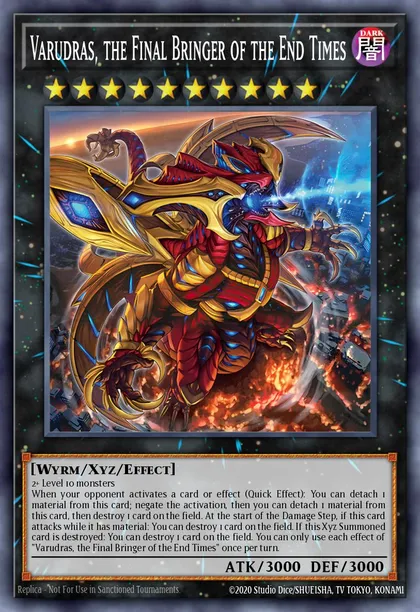
Putting 2 8s on board is pretty easy, so rank 8s like Loading... can help you increase ceiling, but it really isn't needed for a deck with such a high ceiling already
You can make Loading... pretty easily after resolving Loading... as the tokens are level 2, only needing a way to a level 2 tuner.
-
Off of a board of Nauya + four Ogdoadic tokens, you can make Loading... with a Link Spider from a token and the Nauya, then fuse two tokens into Loading... a level 2 tuner, then use the last token and Allvain for Arc Light, by then linking off the Arc light you can search for Habakiri. The benefit of this line is that it uses no main deck cards while being stronger into Nibiru because it doesn't use Daybreak's GY effect. However it does use three extra deck slots and while this deck's extra isn't super tight, it isn't very open either
-
You can also use Loading... to send the tuner from your deck to the GY, the easiest of those is Loading... as it just gets itself out. The nice thing about this line as that it can just use the tokens and uses one less extra deck slot. On the other hand it puts another brick into deck and the Sprind is useless onboard.
It's very easy to revive the Arc Light after you use it with Nephilabyss or A Bao A Qu, though this deck isn't exactly missing ceiling and the cards used to get to Arc Light are only useful at making it and not good for going second.
Fiendsmith
The main reason to use Fiendsmith as that it gives you a better play into droll, though it's worse into Maxx "C" and the Charmies, and will lose you extra deck flexiblility.
Bare minimum


If you just want the Droll backup and Cesear on your main endboard, you can play Engraver as a brick. The Main reason you'd want to do this is that it's only one main deck slot.
You can also play a no bricks package that doesn't lose to Droll by running Sanct.
With Tract
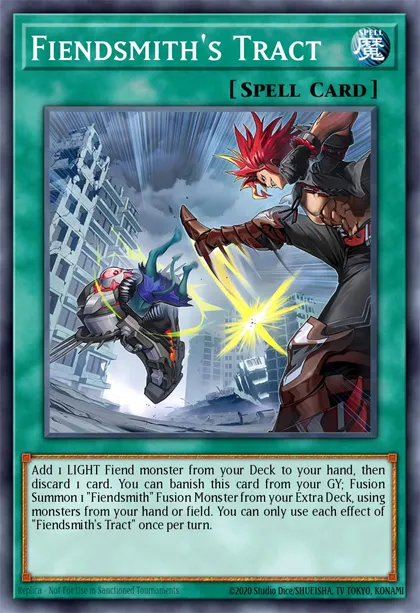

Playing Tract makes the push off of Engraver stronger into boards, as you'll get two LIGHT Fiends instead of just one off of adding Sanct. However adding Tract makes Engraver bad into Droll.
With Sequence & Crimson Tears
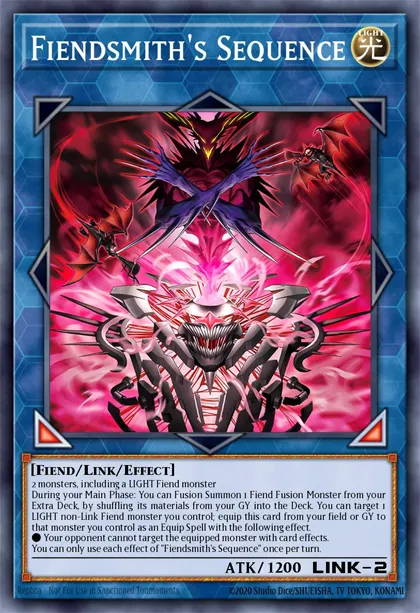

By running Sequence you can get more bodies off of the Fiendsmith combo, increasing your ceiling, but further reduces the flexibility in the extra deck
Playing a second Lacrima lets you bridge to KOTFI with Engraver by adding Lacrima off of Tract, normal summoning her, sending a second Engrager to the GY, special summoning Engraver from the GY, making Requiem with Engraver, then special summoning the second Lacrima out of the deck.
Ragnaraika
Ragnaraika is similar to Tri-Brigade, but instead of supporting Beast, Beast-Warrior, and Winged Beast, it supports Reptile, Plant and Insect.
The Ragnaraika engine gives you extra pushes and a stronger endboard with and without access to Mitsurugi, but still possesses the same weaknesses to Droll, Maxx "C", and making the deck worse into Mulcharmies. As well you lose flexibility in the extra by being forced into the RIP tri-type.
Main Deck Engine
Loading... is the main starter for the Ragnaraika engine, adding two Ragnaraika cards from deck or banishment, importantly it has to add 2 cards, so if you play too few Ragnaraika cards and draw too many, it's effect can't be used. The Evil Seed's special summon condition can be helpful to discard cards you want in the GY, though discarding Mitsurugis isn't something you'll want to do often, as they won't trigger.
Loading... is the main monster you'll be adding with Evil seed. The reborn of Samurai Beetle is flexible, getting any level 4 or lower RIP from GY lets you use Mitsurugi Ritual to get a lot of different reptiles on the field.
Loading... plays a similar role as it does without the other Ragnaraikas, just a level four extender with utility being a Ragnaraika name.
Loading... is removal and Loading... is GY disruption, play one or the other, if at all.
Extra Deck
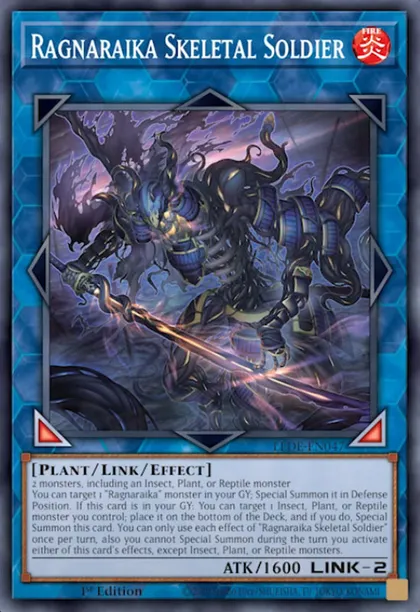


Loading... is part of the main way you bridge to and from Ragnaraika being a Plant that can be made with any Reptile/Insect/Plant, including tokens. Importantly Skeletal Soldier's lock is unique within Ragnaraika, it's the only card which has a full turn lock, not just after you use its effect. Its reborn is usually best used on Evil Seed when starting with Ragnaraika, and Armored Lizard when starting with Ogdoadic/Mitsurugi
Loading... is your way to bridge into Ogdoadic and Mitsurugi, getting any plant from deck by tributing a monster. You need Jasmine to brigde because Ragnaraika has no way to put two level fours on the board within it's own engine
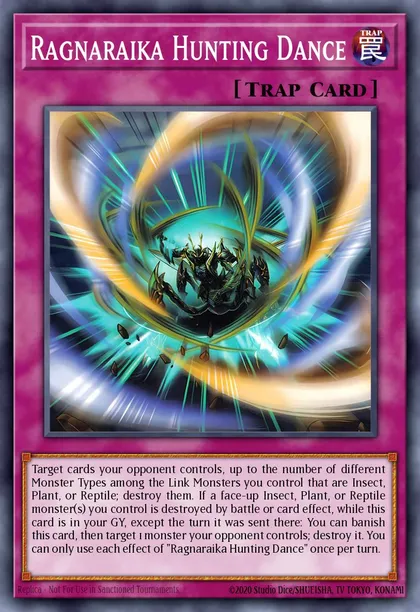
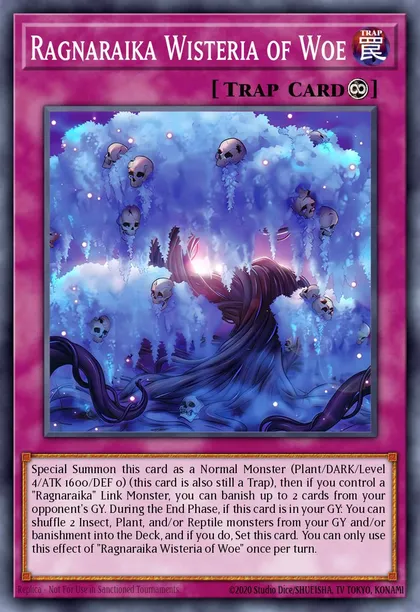
Loading... searches either a GY banish in Wistria of Woe or Hunting Dance, which destroys up to 3 cards. Mantis Monk has no use outside of searching these cards, so feel free to not play it if you aren't on the traps
Loading... let's you increase the ceiling of your endboard by summoning Loading... for a Monster/Most often a Spell negate, you could also summon Loading... for removal, but there's already removal on the endboard, so it is redundant. There's plently of ways to tribute
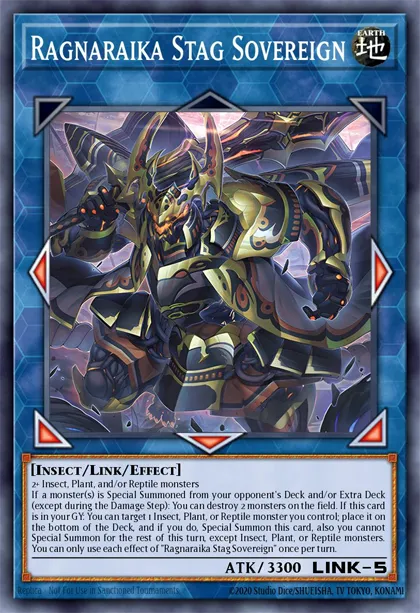
The other Ragnaraika Links perform the same role as they do in other builds, they'll just be apart of the standard endboard in the case of Chain Coils and Stag Sovereign
Bridges

You can either bridge to Ogdoadic/Mitsurugi through either Loading... to search Habakiri or Loading... (or any level 4 plant) to make KOTFI.
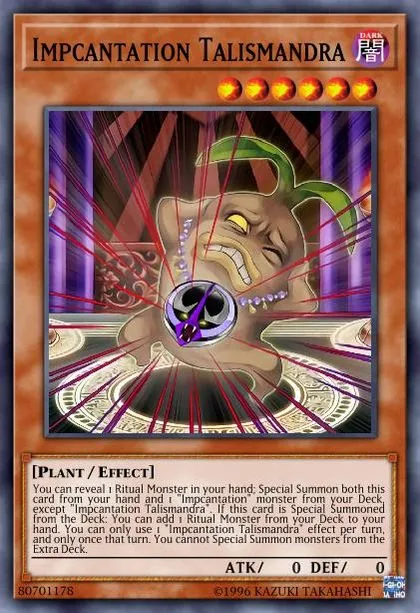
Talismandra allows for a higher ceiling, while Rikka Princess is a much better draw in comparison, while also letting you do set ups to turn on it's GY effect, however makes you go more minus on your main combo.
Extra Starters
Loading... is an extra normal summon if you are in need, as well it can have even more utility in combos with a bigger plant package with its soft-once-per-turn effect
Since you might already be playing Loading... you can also include Loading... as an extra starter, and a pretty high quality one at that, getting to Habakiri without using your normal summon, though be warned, as getting the Talismandra stuck on your board pretty much ends your turn. If you want even more copies of Chalislime or want it searchable off of Thrust, you can also play Loading... .
Ryzeal
Ryzeal can be used just as extra starters and ceiling, just running Ice, Sword and Ext, or as a larger package to make it apart of the main gameplan.
The Ryzeal starters are okay into droll being able to at least make Detonator, but weaker into Maxx "C", Fuwalos, and Purulia.
Evol
Evol was one of the main ways to play Ogdoadic before Mitsurugi.
The Evol engine gives the deck more normal summon starters, which also increase ceiling by getting access to a double omni negate, as well as the option for a double monster negate, which was important before Mitsurugi release as the deck lacked a convincing in-archetype normal summon and a negate for Spell/Traps.
Evol improves plays into Maxx "C", Droll and Mulcharmies when starting with it, though it adds a signifigant amount of bricks which you don't want to draw and the starters are all normal summons and don't have an ability to extend
Main Engine


Loading... and Loading... are the main starters of the Evol engine, Lios is the better card to start with as it's much better into handtraps as it doesn't tribute itself and is level 4 for KOTFI. Lios's ability to make monsters into different levels and types comes up for specific combos and can mess a board up going second on occasion.
Loading... and Loading... are how the Evol engine can bridge to Ogdoadic. By sending Misc with Lios's effect it can summon Animadorned from the deck, Animadorned can then destroy Lios to add Loading... from the deck to hand. Unfortunately both of these cards are bad draws, Misc can be used to just summon a body, but Animadorned can shut off plays if drawn as Misc only summons from deck.
Loading... is set for free off of Lios. Its best target is Loading... , getting two negates as it's material will be Reptiles and Dinosaurs.
Loading... is how you'll be bridging to the Evol engine if you don't open it, by sending Megachirella off of Daybreak or any other foolish, you can then revive it off of Promethean Princess to do its combo.
Additional Options
Loading... and Loading... perform the same role, adding Lios, Fossil Dig is silghty better as it can add Misc is you already have Lios, but if you don't want to craft it, Evo-Diversity is perfectly fine.
Loading... is also an extra starter, but only in combination with a which tributes, which Ogdoadic and Mitsurugi both have plenty of.
Handtraps that are the most impactful
-
Droll is just the strongest handtrap against Ogdo Mitsu even with a Fiendsmith package. With Daybreak you can set up an I:P + Aron + A Bao A Qu best case. With the Mitsu half you can sometimes end on Murakumo + I:P + A backrow, but it's just hand dependent.
-
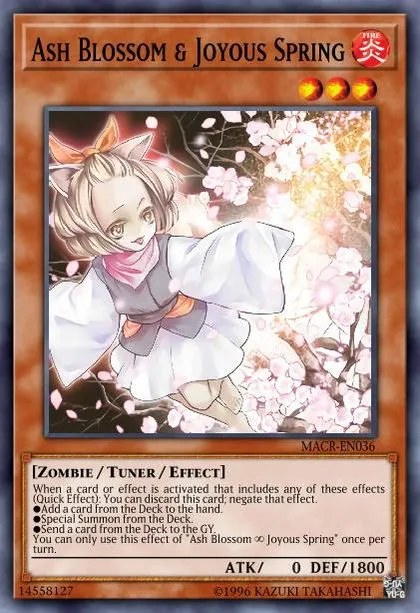
Maxx "C" might be weaker than Droll, strong engine hands can set up well into it, mainly just getting Mitsus out wtith the backrow and maybe an Aron.
-
Impulse is the best non-lingering handtrap against Ogdo Mitsu. It hits Loading... of course, but is also the only handtrap which can negate Daybreak, which can be a devastating 2 for 1, as well it doesn't play into Talents or Thrust.
-
Ash and Belle both can negate important effects, Ash of course can hit Habakiri, Saji, and Nauya's on summon, and Belle can negate Keurse's effect to summon itself, which can really hurt.
Chokepoints
The main chokepoints in the combos are the spell searchers of the two archetypes. There is only one way to search Ogdoadic Spells which is Nauya's effect, so if you didn't open or draw into one you can't access them if Nauya gets negated. The Mitsurugi spells have more ways to access them if Saji gets negated by tributing the Rituals, but also you do just play more Mitsu spells than Ogdo ones.
Deck Matchups
Generally Ogdoadic Mitsurugi is good against decks whose main interaction is removal and on field negates, and are weaker to board breakers. The deck can struggle into negate heavy decks, decks that resist breakers and decks that try to floodgate you.
The reason Ogdo Mitsu is good into removal is that there is a lot of ways to dodge it in the from of the Quickplay spells the deck runs and it just makes so many bodies that one for one removal just has a hard time dealing with it. Negates are much better, even if they don't destroy because they stop the power cards from resolving in the first place.
Going Second
What you'll want to do depends on the deck your playing against and your hand, but in general it is better to lead the Ogdoadic cards to try and either bait interaction with them, or use generic Links as removal or cards like Echidna to threaten to get Mitsurugi cards.
If you know your opponent has no negates (or only one) it can be better to lead Mitsurugi to break the board instead, because you can lock yourself going second pretty freely you can use Wousu to great effect, so if your opponents sole omni negate is being held for Ritual, you can search out Wousu to punish them.
Lists
Here are some reference lists, feel free to change them how you like, especially the non-engine, as those are format dependent
Heavy engine with Breakers


Minimal engine with Turnskips and counters
60c Fiendsmith with Breakers
Minimal engine with Fiendsmith
Ragnaraika
Combos
If you don't want to feel out the combos yourself here is a collection that you can reference. I want you to keep in mind that these aren't set in stone and can be changed however you like.
The combos in this section make use of all the cards in this list, if you are not on these cards, change them where necessary.
1 Starter Combos
Nunu + 1 Discard (Replay for adding Nauya first, respecting Nibiru) (Replay for adding Habakiri first)
-
Activate Loading... 's effect, sending Loading... to the GY
-
Activate Zohah's GY effect, sending 1 card from your hand to the GY to add it back to hand
-
Activate Nunu's GY effect, summoning him to to the field
-
Normal summon Zohah
-
Make Loading... with Zohah and Nunu
At this point you can either add Loading... or Loading... , it doesn't matter a ton, adding Nauya first plays slightly worse into Bystials, while adding Habakiri makes your Mitsurugi combo weaker, making it harder to punish opponents who hold their interaction for the Mitsurugi cards.
Adding Nauya
-
Activate Nauya's effect, sending Loading... to the GY
-
Activate Keurse's GY effect, summoning him from the GY by tributing KOTFI
-
Activate Keurse's on summon effect, reviving Nauya
-
Activate Nauya's on summon effect, adding Loading...
-
Activate Daybreak, tributing Keurse, and summon 4 tokens
-
Make Loading... using 1 token
-
Make Loading... with a token and Link Spider
-
Activate Lizardose's effect, banishing a reptile, targeting any monster other than Lizardose if possible, to draw a card
-
Make Loading... , using Haggard Lizardose and a token
-
Make Loading... using Knightmare Unicorn and the final token
The combo can then diverge from here, as shown in the Replay at the top, you can use A Bao A Qu's revive here to get a level 4 to make KOTFI and hold Daybreak's send, the reason to this is to play around getting Nibiru'd on the second KOTFI summon, as holding Daybreak's GY effect lets you play through it.
You can also use Daybreak to send Loading... to the GY to make KOTFI and hold A Bao A Qu's effect to revive something else, being something like Zohah with an on summon effect to chain block Saji's search with. Instead of NSS you can also send Loading... to revive it and get the search, opening up the second KOTFI to search something else, or not make it entirely.
Line 1, using A Bao A Qu to Revive early, saving Daybreak
-
Use A Bao A Qu's effect, reviving a level 4 from the GY
-
Make KOTFI with Nauya and the revived level 4
-
Search Habakiri with KOTFI
-
Activate Habakiri's effect, summoning and tributing Loading...
-
Activate Saji's effect, adding Loading...
-
Activate Prayers, tributing Habakiri and use both effects, adding Loading... then special summoning it
-
Activate Habakiri's effect to search as chain link 1, then Aramasa's effect as chain link 2, adding Loading... and Loading...
-
Activate Ritual to summon from Murakumo from hand, tributing Loading... and Loading... from deck.
-
Activate Kusanagi's effect as chain link 1, targeting Ritual and NSS's effect as chain link 2
-
Activate Ritual to summon Loading... from deck, tributing Muraumo from field
-
Activate Murakumo's effect to search, adding Prayers and summoning it from the GY
-
Use Loading... 's GY effect to shuffle back a banished reptile to send Loading... or any other of the high level Ogdoadics which tribute to the GY
-
Summon Aron from the GY, tributing Futsu and any other monster
-
Use Futsu's effect to search, adding Loading... or Loading... and summoning Futsu back to the field
-
Make Loading... using monsters other than Futsu, and leaving either Aron or Murakumo on board
-
Set the two searched backrow, and go to the end phase, where A Bao A Qu will return to the board.
Endboard
I:P into S:P for 2 banishes, A Bao for a non targeting pop, Board wipe and the onmi/hand rip from Murakumo, hand rip with Aron, and Omni off of Purification.
It doesn't seem like that much, but the handrips are very impactful and the amount of GY recursion makes the board have a ton of follow up and blockers to fight through.
Line 2, Sending then reviving Aramasa(Replay from this point)
-
Activate Daybreak's GY effect, sending Aramasa
-
Activate A Bao A Qu's effect, reviving Aramasa
-
Activate Aramasa's effect, searching Habakiri
-
Make KOTFI with Nauya and Aramasa
-
Use KOTFI to search Loading... , search your alternate target if you don't play Aron, or don't make KOTFI at all
-
Activate Habakiri's effect, summoning and then tributing Saji
-
Activate Saji's effect, adding Prayers
-
Activate Prayers, tributing Habakiri and apply both effects, adding Murakumo and special summoning either Saji or Aramasa out of the GY
-
Activate Habakiri's tribute effect, adding Ritual
-
Activate Ritual to summon Murakumo from hand, tributing Kusanagi and NSS
-
Activate Kusanagi's effect as chain link 1, targeting Ritual, and NSS's effect as chain link 2
-
Make I:P with NSS and KOTFI
-
Activate Ritual to summon from deck, tributing Aron from hand to summon Futsu, if you didn't add an 8 with KOTFI, or didn't make it at all, you'll tribute Murakumo instead
-
Activate Aron's effect in the GY, tributing Fustu and Murakumo
-
Activate both Futsu and Murakumo's tribute effect, searching Prayers and Great Purification or Magatama, and special summoning both
-
Set both added backrow and end turn, where A Bao A Qu will return in the end phase.
You end up with 1 extra body with this combo over Line 1, which you may have something to do with.
Line 3, Sending NSS, using Zohah to chain block Saji(Replay from this point)
-
Activate Daybreak's GY effect, sending NSS
-
Special summon NSS with it's effect
-
Make KOTFI with Nauya and NSS
-
Use KOTFI to search Habakiri
-
Activate Habakiri, then chain A Bao A Qu to summon, summon Zohah from the GY and special Saj from deck, tributing it
-
Activate Saji as chain link 1 and Zohah's search effect on chain link 2, adding Aron then discarding a card with Zohah and adding Prayers with Saji
-
Activate Prayers by tributing Habakiri, using both effects, to add then special summon Aramasa
-
Activate Habakiri's tribute effect as chain link 1, and Aramasa's search as chain link 2, adding Murakumo and Ritual
-
Make I:P with 2 of your monsters
-
Activate Ritual to summon Murakumo from hand, tributing Kusanagi and any other level 4 reptile
-
Add back Ritual with Kusanagi
-
Activate Ritual to summon Futsu from deck, tributing Aron in hand or if you discarded it, Murakumo from field and summon back the tributed Murakumo adding Prayers.
-
Tribute both Rituals with Aron, if you discarded Aron, still tribute Futsu but you can choose to not to tribute Murakumo and instead the extra monster.
-
Use the Tribute effect of the tributed Ritual(s), and summon it(them) and adding Purification (and if both, also Prayers), set both added backrow and pass.
You can make Dyna Mondo or S:P at the end if you would like.
Adding Habakiri
- Activate Habakiri's effect to summon and tribute Loading...
You could tribute KOTFI to have a level 4 on field, but it plays worse into negation handtraps, though they likely would be used on KOTFI
-
Use Saji's effect to add Loading... from deck to hand
-
Activate Prayers, tributing Habakiri from hand and apply both effects, adding and summoning Loading...
-
Activate Habakiri as CL 1 and Aramasa as CL 2, adding Loading... and Loading...
-
Activate Ritual to summon Murakumo from hand, sending Night Sword Serpent (NSS) and Loading...
-
Make KOTFI in the EMZ with NSS and Aramasa, and add Nauya
-
Activate Nauya's effect, sending Keurse, the Ogdoadic Light to the GY
You can either tribute KOTFI or Murakumo with Keurse, it doesn't make much of a difference
-
Tribute the KOTFI in the MMZ to summon Keurse
-
Use Keurse to to summon Nauya from the GY
-
Add Loading... with Nauya
-
Link off Nauya and the second KOTFI for Loading...
-
Activate Lizardose's effect banishing Night Sword Serpent to draw a card
-
Activate Daybreak tributing Keurse, summoning four tokens
-
Make Loading... with Lizardose and a token
-
Make Loading... with Knightmare Unicorn and a token
-
Make Loading... with the final two tokens
-
Activate Mitsurugi Ritual to summon Loading... from the deck
-
Activate Murakumo's tribute effect to add Prayers from deck to hand and summon it back
-
Use Daybreak's GY effect to shuffle a banished reptile into the deck and send Loading...
-
Tribute Murakumo and Futsu to summon Aron
-
Activate Futsu's tribute effect to add Purifiaction and summon it back
-
Discard a card to use A Bao A Qu to summon back Knightmare Unicorn
-
Make Loading... with Unicorn and Aron
-
Set both added backrow and end turn, where A Bao A Qu will return in the end phase.
Endboard
I:P for S:P for 2 banishes, A Bao for a non-targeting pop or revive, Chain Coils to lock out hand effects, Futsu to revive reptiles for follow up and interaction, Murakumo to board wipe and to have an handrip/omni, Aron to handrip and Purification to Omni negate.
If you open Nunu with another level 4 you can instead send Nephilabyss to help play through handtraps and also increase ceiling.
Nunu + Level 4(Replay)
Nauya is a 1 card combo on it's own by normal summoning it. Replay
-
Normal summon Nauya and use the effect, adding Loading...
-
Activate Ogdoadic Water Lily, sending Nunu
-
Activate Nunu's effect to summon itself
-
Make KOTFI with Nunu and Nauya, and use the effect to add Habakiri
-
Use Habakiri to summon and tribute Saji
-
Use Saji to search Prayers
-
Activate Prayers, tributing Habkiri and apply both effects, adding then special summoning Aramasa
-
Activate Habakiri as CL 1 and Aramasa as CL 2, adding Murakumo and Ritual
-
Activate Ritual to summon Murakumo from hand, sending Night Sword Serpent (NSS) and Kusanagi
-
Activate Kusanagi as CL 1, targeting Ritual and NSS as CL2, summoning NSS and adding back Ritual to hand
-
Make KOTFI with NSS and Aramasa, and add Loading...
-
Make I:P with both KOTFIs
-
Activate Ritual to summon Futsu from deck, tributing Aron from hand
-
Summon Aron from GY, tributing Murakumo and Futsu
-
Trigger both Futsu and Murakumo's tribute effect, adding Prayers and Purification.
You can set both added cards and pass, or you can make A Bao A Qu and summon back I:P to still end on it, either with Knightmare Unicorn or if you play a link 2 fiend you can give A Bao I:P's destruction protection.
This combo is pretty much the same as the Nunu combo which adds Nauya first, but doesn't need to use KOTFI to search Nauya, so it has an open search which can instead be used for Aron for ceiling and Nunu's summon isn't used, so it can be sent off of Daybreak to make KOTFI to search Habakiri instead of NSS. However this commbo is weaker into a well placed Nibiru, as you are more likely to need to use Daybreak to make KOTFI as you don't get a level 4 to summon out of the GY with A Bao A Qu unless it is your normal summon.
Snake Rain has a lot of different combinations of sends you can do, some safer, some higher ceiling.
Safer Line: Snake Rain sending Nunu, Zohah, Keurse and Nauya (Replay)
The reason this combo is safer is that it is two pushes, one that makes KOTFI to get Habakiri, and one after through Keurse that can still get to a second KOTFI.
Riskier Line which doesn't use the normal suommon: Snake Rain sending Nunu, Keurse, Nauya and NSS (Replay)
If you have a level 4 normal summon, these sends are just as safe, as you'll still get the double push. Though sending Nephilabyss is better in that scenario, as its the better extra push.
All combos here work the same if starting with Pre-Prep, Aramasa and Loading... .
Habakri, searching Prayers first
This combo is bad into droll, but better into interaction saved for Ritual
Line 1: Special summoning Saji with Prayers (Replay)
This line is better into Nibiru and Impluse
-
Activate Habakiri to summon Saji
-
Use Saji to add Prayers
-
Activate Prayers, tributing Habakiri from hand and use both effects, adding Aramasa and special summoning Saji from the GY
-
Use Habakiri's tribute effect to add Ritual
-
Normal summon Aramasa and use the effect to add Murakumo
-
Summon KOTFI using Aramasa and Saji and search Nauya with it
-
Use Nauya's hand effect to send itself and Keurse to the GY
-
Summon Keurse from the GY by tributng KOTFI and summon Nauya with it's effect
-
Search Daybreak with Nauya
-
Activate Daybreak tributing Keurse to summon 4 tokens
-
Make Link Speider with a token then Link it and a second token for Haggard Lizardose
-
Activate Mitsurugi Ritual to summon Murakumo from hand, sending Kusanagi and NSS to the GY
-
CL 1 Kusanagi to add back Ritual CL 2 NSS to summon itself
-
Make KOTFI with Nauya and NSS and search Aron
-
Activate Ritual to summon Futsu from deck by tributing Aron from hand
-
Use Lizardose to banish a Reptile from your GY to draw a card
-
Make Knightmare Unicorn with Lizardose and a token
-
Make A Bao A Qu with Unicorn and the final token
-
Summon Aron from the GY by tributing Murakumo and Futsu
-
Use Futsu and Murakumo's tribute effects to search Prayers and Purification and summon both
-
Make I:P with KOTFI and Aron
-
Use Daybreak to shuffle back a banished reptile and send Nephilabyss to the GY
-
Use A Bao A Qu's effect to summon Nephilabyss from the GY
-
Use Nephilabyss's effect to summon Unicorn out of the GY
-
Make Ragnaraika Chain Coils with Unicorn and Nephilabyss
-
Set the added backrow and go to the end phase, where A Bao A Qu will return to the field.
Line 2: Special summoning Aramasa with Prayers (Replay)
This line has a higher ceiling by not using its normal until late into the combo and it chain blocks Habakiri's search.
-
Activate Habakiri to summon Saji
-
Use Saji to add Prayers
-
Activate Prayers, tributing Habakiri from hand and use both effects, adding Aramasa and special summoning Aramasa from the hand
-
CL 1 use Habakiri's tribute effect to search Ritual, then as CL 2use Aramasa's effect to search Murakumo
-
Activate Ritual to summon Murakumo from hand by sending Kusanagi and NSS to the GY
-
CL 1 use Kusanagi's effect to add back Ritual then as CL 2 use NSS to summon itself
-
Make KOTFI with Aramasa and NSS to search Nauya
-
Activate Nauya's hand effect to send itself and Keurse to the GY
Option 1: Tribute Murakumo, shown in top replay
-
Tribute Murakumo to summon Keurse from the GY
-
Cl 1 use Murakumo's Tribute effect to add Prayers and summon itself, and CL 2 summon Nauya with Keurse
-
Make Lizardose with KOTFI and Murakumo
-
Use Lizardose to banish NSS from the GY to draw
-
Activate Daybreak tributing Keurse and summon 4 tokens
-
Make Unicorn with Lizardose and a token
-
Make A Bao A Qu with Unicorn and a tokem
-
Use Daybreak's GY effect shuffling back a banished reptile and sending Nunu
-
Make I:P with the last 2 tokens
-
Summon Nunu from the GY with it's effect
-
Make KOTFI with Nunu and Nauya and search Aron, or search Lamia and normal summon it to search Aron.
-
Activate Ritual tributing Aron from hand to summon Futsu from deck
-
Summon Aron from the GY by tributing KOTFI and Futsu
-
Use Futsu's tribute effect to add Purification and summon itself
-
Use A Bao A Qu's effect to summon Unicorn from the GY
-
Link off Unicorn and Aron for Chain Coils, if you searched Lamia, use it instead of Aron
-
Set the added backrow and go to end phase, where A Bao A Qu will return to the field.
Option 2: Tribute KOTFI (Replay)
By not tributing Murakumo until after A Bao A Qu hits the field, it plays better into Bystials/Crow saved for banishing it, as well it not getting tributing for cost, allowing them to also "negate" the search
-
Summon Keurse by tributing KOFTI then summon Nauya with it's effect
-
Use Nauya's effect to add Daybreak to hand
-
Activate Daybreak by tributing Keurse to summon 3 tokens
-
Use 1 token for Link Spider then another for Haggard Lizardose
-
Use Lizardose to banish a reptile from the gy to draw a card
-
Use Daybreak's GY effect to send Nunu to the GY
-
Summon Nunu with it's effect
-
Make KOTFI with Nunu and Nauya to search Lamia if you haven't normal summoned, Aron if you have
-
Normal Lamia and search Aron with it's effect
-
Make Knightmare Unicorn with Lizardose and the last token, then make A Bao A Qu with Unicorn and Lamia
-
Activate Ritual to summon Futsu from deck by tributing Aron
-
Tribute both Murakumo and Futsu to summon Aron
-
Use Futsu and Murakumo's tribute effects to search Prayers and Purification and summon both
-
Make I:P with KOTFI and Aron
-
Use A Bao A Qu's effect to summon back Unicorn
-
Make Ragnaraika Chain Coils with Murakumo and Unicorn
-
Set the added backrow and go to the end phase, where A Bao A Qu will return.
Habakiri, searching Ritual first
This combo is better into Droll, but is weaker into interaction saved for Ritual and Nibiru
Line 1: Tributing Habakiri with Keurse(Replay)
-
Activate Habakiri to summon Saji
-
Use Saji to add Mitsurugi Ritual
-
Activate Mitsurugi Ritual to summon Habakiri from hand and send NSS and Aramasa
-
CL 1 use Aramasa to add Kusanagi and as CL 2 use NSS's effect to summon itself
-
Normal summon Kusanagi and use it's effect to add back Ritual
-
Summon KOTFI in the EMZ with NSS and Kusanagi and add Nauya
-
Use Nauya's effect to send itself and Keurse to the GY
-
Tribute Habakiri to summon Keurse from the GY
-
CL 1 Habakiri to search Prayers and special itself, CL 2 Keurse to summon Nauya from the GY
-
Activate Nauya's effect to search Daybreak
-
Link off Habakiri and KOTFI for Lizardose
-
Banish NSS with Lizardose to draw a card
-
Activate Daybreak to tribute Keurse to summon 4 tokens
-
Make Knightmare Unicorn with Lizardose and a token
-
Make A Bao A Qu with Unicorn and a token
-
Use A Bao A Qu's effect to summon a level 4 from the GY
-
Make KOTFI with Nauya and the other level 4 to search Futsu
-
Use the remaining 2 tokens to summon I:P
-
Activate Ritual to summon Murakumo from deck by tributing Futsu
-
Add Mirror with Futsu's tribute effect
-
Summon Futsu from the GY with Mirror by tributing Murakumo
-
Use Murakumo's tribute effect to add Purification and summon it
-
Use Daybreak's GY effect to shuffle back a banished reptile and send Aron to the GY, then you can choose to summon it to the field or not, if you are, tribute Murakumo and KOTFI
-
Set backrow in hand and go to end phase, where A Bao A Qu returns.
You don't have to search Prayers in this combo to end on both interaction backrow, but it is less safe.
Line 2: Tributing KOTFI with Keurse(Replay)
This plays better into Bystial/Crow by not tributing the Habakiri for cost
-
Activate Habakiri to summon Saji
-
Use Saji to add Mitsurugi Ritual
-
Activate Mitsurugi Ritual to summon Habakiri from hand and send NSS and Aramasa
-
CL 1 use Aramasa to add Kusanagi and as CL 2 use NSS's effect to summon itself
-
Normal summon Kusanagi and use it's effect to add back Ritual
-
Make KOTFI and add Nauya
-
Use Nauya to send Keurse
-
Summon Keurse by tributing KOTFI and use its effect to summon Nauya
-
Activate Nauya's on summon effect to add Daybreak
-
Activate Daybreak and tribute Keurse to 3 tokens
-
Use a token to summon Link Spider
-
Use Link Spider and a token to summon Lizardose
-
Banish NSS to draw a card with Lizardose
-
Use Daybreak's GY effect to send Nunu to the GY
-
Summon Nunu from the GY
Option 1: Add Aron with KOTFI, then tribute it from hand, giving up Futsu, Shown in first Replay
-
Make KOTFI with Nunu and Nauya to search Aron
-
Make Knightmare Unicorn with Lizardose and a token
-
Make A Bao A Qu with Unicorn and KOTFI
-
Use Ritual to summon Murakumo from deck by tributing Aron in hand
-
Summon Aron from the GY by tributing Habakiri and Murakumo
-
Use the tribute effects of Murakumo and Habakiri to add Prayers and Purification and summon them both from the GY
-
Make I:P with any 2 monsters
-
Summon Unicorn from the GY with A Bao A Qu
-
Make Chain Coils with Unicorn and the monster that isn't I:P.
You can choose to not make Chain Coils here, either leaving your Reptiles on board, you can make a rank 8 or something like Dyna Mondo.
Option 2: Add Futsu, giving up Aron and a second Mitsurugi backrow *(Replay from KOTFI add)
-
Make KOTFI with Nauya and Nunu to search Futsu
-
Make Knightmare Unicorn with Lizardose and a token
-
Make A Bao A Qu with Unicorn and KOTFI
-
Activate Ritual to summon Murakumo from deck tributing Habakiri
-
Add Prayers with Habakiri and summon it
-
Tribtue Futsu from hand with Prayers, adding any monster and special summoning a level 4 from the GY
-
Add Mirror with Futsu's tribute effect
-
Use Mirror to summon Futsu from the GY
-
Use Murakumo's tribute effect to add Purification or Prayers and special summon it from the GY
-
Make I:P with Habakiri and Aramasa
-
Use A Bao A Qu to summon Unicorn from the GY
-
Make Chain Coils with Murakumo and Unicorn
-
Set the added backrow and pass, where A Bao A Qu will return in the end phase
2 Card Combos
Ritual that isn't Habakri + Mitsurugi Ritual (Replay)
This line has similar approaches to the Ritual summoning Habakiri combos above, but are stronger due to having Saji's earch and both of Habakiri's effects open.

Saji + any Reptile (Replay)
-
Normal summon Saji and activate it's effect, adding Mitsurugi Prayers
-
Activate Prayers, tributing the reptile in hand, to add and special summon Aramasa
-
Activate Aramasa's effect, adding Habakiri to hand
-
Make KOTFI with Saji and Aramasa
-
Use KOTFI to search Nauya
-
Activate Nauya's effect, sending itself and Keurse to the GY
-
Use Keurse's GY effect to special summon itself out of the GY by tributing KOTFI and then special summon Nauya
-
Activate Nauya's on summon effect, adding Daybreak
-
Activate Daybreak, tributing Keurse and summon four tokens
-
Link off one token for Link Spider
-
Link off the Link Spider and another token for Haggard Lizardose
-
Use Haggard Lizardose to banish a reptile from the GY to draw a card
-
Activate Daybreak's GY effect, shuffling the reptile you banished back into the deck, and send Nunu to the GY
-
Activate Nunu's effect to special summon it from the GY
-
Make KOTFI with Nunu and Nauya
-
Use KOTFI to add any normal summonable/set reptile, like Zohah, except Loading...
-
Use the last two tokens to make I:P
-
Link off KOTFI and Haggard Lizardose for Summon Sorceress
-
Activate Summon Sorceress's effect, summoning your added reptile to your opponent's field and special summon Aron from your deck to your field.
20, Link off Summon Sorceress and Aron for Loading...
-
Use Echidna to make the opponent's given monster ATK 0, then use Echidna's effect to add Murakumo from deck to hand
-
Activate Habakiri's effect to special summmon Wousu from the deck, then tribute it
-
Use Wousu's effect when tributed to add itself back to hand by discarding a card
-
Special summon Wousu by tributing Habakiri and the given monster
-
Activate Habakiri's tribute effect to add Mitsurugi Ritual
-
Use Ritual to summon Murakumo from hand, tributing Kusanagi and NSS
-
Activate Kusanagi's effect as chain link 1, targeting Ritual, and NSS's effect as chain link 2
-
Use Ritual to summon Futsu from deck, tributing Wousu
-
Tribute both Futsu and Murakumo to summon Aron from the GY
-
Use Futsu and Murakumo's tribute effect to add Prayers and Great Purification, specialing both
-
Link off Echidna, NSS and Murakumo or Aron to summon Chain Coils
-
Set both added backrow and end turn.
Zohah, Body and 1 Discard (Replay)
The body here can be anything, Black Mamba as shown in the replay, or something like Fenrir or any token
Water Lily/Foolish effect + Daybreak (Replay)
Keurse + Mitsurugi Ritual (Replay)
This combo also works if you draw Mirror, Keurse and Ritual access
Handripping
To do the handrip you need Aron on field when you use the search effect of Zohah. You can do this in quite a few different ways, by using Zohah as one of the tributes for Aron summon, reviving Zohah while you control Aron, or in the case of 2 of the combos below, destroying a given Zohah with Murakumo's effect.
All but one of the 1 starter combos need to give up A Bao A Qu on board to handrip, as well they need to use Loading... .
Nunu + Discard(Replay)
Snake Rain is the starter that still get A Bao A Qu on board as well
Snake Rain + 2 Discards for Handrip (Replay)
Every hand that opens Daybreak can do the handrip by getting Water Lily with Nauya, also not having to use Summon Sorceress.
Nunu + Daybreak + Discard(Replay)
You'll want to try to have Murakumo on board when you do the handrip in case they have a gy trigger or draw into a card they want to use
Zer'oll
Zer'oll is pretty trivial to set up, especially because of Futsu, allowing you to link off Shocktrooper intsead of having to end on both on board, as well it is incredibly dificult to break through, with the level 4 Mitsurugi's protection and Futsu's revive.
Nunu + Discard, respecting Nibiru(Replay)
Zer'oll needs three bodies to set up, in 1 card combos this will lead to not ending on I:P or A Bao A Qu, though that is basically always fine due to how oppresive Zer'oll is. If you have to choose I'd recommend A Bao A Qu pretty much always, as it's another way to revive any part of the lock that gets outed.
Fiendsmith Lines
Just Engraver
(Replay) - Necrquip, not using Aron but it is stronger with it
(Replay) - Sequence, Uses Aron, but it is not necessary
Using Crimson Tears
(Replay) - No Aron
(Replay)- With Aron
Both combos make Ceasar, but the combo is no different if making Desirae
(Replay) - Engraver > KOTFI, using 2 Crimson Tears
Ragnaraika Lines
Bloom also works as a starter, but requires an extra discard.
Evil Seed 1 card combo using Talismandra as the bridge (Replay)
Starting with Ogdoadic (Replay)
Setting up Hyperyton to negate spells can be annoying, as by the time you summon it, you'll gone through most engine spell effects, so when possible, try to make Hyperyton earlyish in the combo.
Arc Light Combos

These combos start just like the main 1 card combos, but differ after the resolution of Daybreak
Combos through Interaction
Through Impluse/Ash

The combos here aren't just going to be draw the card that was going to be searched, or a second Ritual. The combos that aren't just drawing the extender that beat Impulse on Ritual and Ash on Saji do not beat Nibiru, so if Nibiru is popular in the format, it may not be worth playing in this way unless you draw a way to beat it.
Impulse on Ritual from Hand, searching Prayers first
The combo starting with Nauya is better, but less likely to be drawn
Nunu + Reptile + Discard, using Summon Sorceress (Replay)
-
Activate Nunu's effect, sending Zohah to the GY
-
Activate Zohah's GY effect, sending 1 card from your hand to the GY to add it back to hand
-
Activate Nunu's GY effect, summoning him to to the field
-
Normal summon Zohah
-
Make KOTFI with Zohah and Nunu
-
Add Nauya
-
Activate Nauya's effect, sending Keurse to the GY
-
Activate Keurse's GY effect, summoning him from the GY by tributing KOTFI
-
Activate Keurse's on summon effect, reviving Nauya
-
Activate Nauya's on summon effect, adding Ogdoadic Daybreak
-
Activate Daybreak, tributing Keurse, and summon 4 tokens
-
Make Link Spider using 1 token
-
Make Haggard Lizardose with a token and Link Spider
-
Banish Zohah from the GY with Lizardose to draw a card
-
Use Daybreak to shuffle back Zohah and send NSS to the GY
-
Summon back NSS with it's effect
-
Make KOTFI with Nauya and NSS and add Habakiri
-
Activate Habakiri to summon Saji, and tribute it
-
Use Saji to get Prayers
-
Activate Prayers, tributing Habakiri to use both effects adding and special summoning Aramasa
-
CL 1 Habakiri add Ritual, CL 2 Aramasa add Murakumo
-
Activate Ritual, get Impulsed
-
Make I:P with 2 tokens
-
Make Summon Sorceress with Lizardose and KOTFI and use it's effect to summon the reptile in hand to the opponent's field and Aron to yours
-
Make Echidna with Aramasa and Summon Sorceress and put the monster on the opponent's board ATK to 0 to search Wousu
-
Tribute Murakumo in hand and the opponent's monster to summon Wousu
-
Activate Murakumo's tribute effect to add Ritual to hand
-
Activate Ritual to summon Futsu from deck tributing Aron
-
Tribute Futsu and Wousu to summon Aron
-
Activate Futsu's tribute effect to add Mirror and add Wousu back to hand by discarding a card
-
Use Mirror to Ritual summon Murakumo from GY by tributing Wousu
-
Make Chain Coils with Aron, Murakumo and Echidna and end turn.
Endboard: Chain Coils, I:P, Futsu, Murakumo in GY.
This combo can be improved by playing a third KOTFI or playing Eclipse Twins, getting the search for Kusanagi to get Ritual back from the GY
Nauya + Reptile + Normal Summon (Replay)
-
Normal summon
-
Activate Nauya
-
Activate Nauya's effect, sending Keurse to the GY
-
Activate Keurse's GY effect, summoning him from the GY by tributing KOTFI
-
Activate Keurse's on summon effect, reviving Nauya
-
Activate Nauya's on summon effect, adding Ogdoadic Daybreak
-
Activate Daybreak, tributing Keurse, and summon 4 tokens
-
Make Link Spider using 1 token
-
Make Haggard Lizardose with a token and Link Spider
-
Banish Zohah from the GY with Lizardose to draw a card
-
Use Daybreak to shuffle back Zohah and send Nunu to the GY
-
Summon back Nunu with its effect
-
Make KOTFI with Nauya and Nunu and add Habakiri
-
Activate Habakiri to summon Saji, and tribute it
15.Use Saji to get Prayers
-
Activate Prayers, tributing Habakiri to use both effects adding and special summoning Aramasa
-
Make I:P with 2 tokens
-
CL 1 Habakiri add Ritual, CL 2 Aramasa add Murakumo
-
Activate Ritual, get Impulsed
-
Make Summon Sorceress with Lizardose and KOTFI and use it's effect to summon the reptile in hand to the opponent's field and a level 4 reptile that isn't Kusanagi to yours
-
Make KOTFI with Aramasa and the level 4 to add Wousu
-
Make Echidna with Summon Sorceress and KOTFI to make the opponent's monster 0 ATK to search Kusanagi
-
Summon Wousu by tributing the opponent's monster and Kusanagi in hand
-
Use Kusanagi to add back Ritual
-
Activate Ritual to summon Futsu from deck by tributing Murakumo in hand
-
Activate Murakumo's tribute effect to add Mirror
-
Use Mirror to summon Murakumo from the GY by tributing Futsu
28, Activate Futsu's tribute effect to add either Prayers or Purification from deck
- Make Chain Coils with Murakumo, Wousu, and Echidna and set the added backrow and end turn.
Endboard: Chain Coils, I:P, Futsu, Prayers/Purification, Murakumo in GY.
On Saji effect
Nunu + Reptile + Discard (Replay) (It's on Habakiri in this replay, though it doesn't really matter.)
Endboard: I:P, Aron, Murakumo, Prayers.
The Nauya line is the same.
Combos through Nibiru
Ogdoadic Start
On Daybreak Resolution
(Replay)
All combos post Daybreak resolution beat Nibiru as long as the GY effect of Daybreak isn't used and there is a reptile banished. By sending Night Sword Serpent with the effect and then making Loading... with the token and NSS, you can make the Nibiru have 0 ATK to search Habakiri.
From Nunu start, on summon of Nauya, in reponse to the search
This combo will be the same, adding Water Lily instead to accomplish the same thing as Daybreak if you don't have extension. If Nibiru is used on the resolution of Nauya's add for Daybreak, if you have no extenders, you'll wat to chain Daybreak to Nibiru to put it in the GY.
Mitsurugi Start
First Search Prayers, on resolution of Daybreak
(Replay)
This line opts not to lock itself with Echidna, though it can still be used if you wish to end on Chain Coils.
On KOTFI suumon
(Replay)
By Ritual summoning before KOTFI, Nibiru will be usable when you summon it, however because you have a Ritual monster that floats off of Nibiru, your opponent may choose to not Nibiru at the first opportunity.
End of Main
Your opponent may just not use Nibiru until after the combo, if they do, there isn't a ton you can do to extend into another board, most likely you will just be reliant on Prayers or A Bao A Qu to bring back Futsu and Murakumo.
"Floodgate" HT Lines
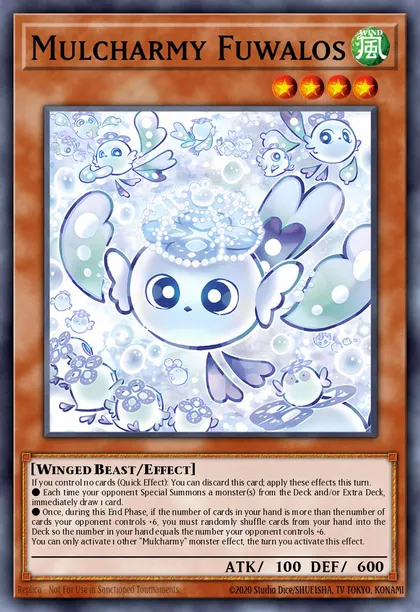
The main gameplan into Fuwalos (and the Charmies in general) is to first get to Mitsurugi combo if it wasn't opened, then getting Aron into the GY to use it to both get extra searches off of the Mitsurugi Rituals, and get a "free" summon from the extra deck, as Aron will rip one card from the opponents hand if they draw off of a Mulcharmy
Snake Rain + 2 Discards(Replay)
Endboard: Futsu, Aron, I:P, Prayers and Murakumo in GY, giving 3 draws and ripping 1 (Opponent starts their turn with 7 cards).
Nauya + Habakiri (Replay)
Endboard: Aron, I:P, Purification, Prayers and Murakumo in GY, giving 2 draw and ripping 1 (Opponent starts with 6 cards).
Futsu can be added to the board for an extra draw.
Habakiri + Snake Rain + Discard (Replay)
Endboard: Aron, I:P, Futsu, Murakumo on field, Prayers and Purification, giving 2 draws and ripping 1 (Opponent will start with 6 cards).
This combo also ends with Water Lily in hand, so if you have an extra main deck reptile to add to the endboard it can be added without a draw.
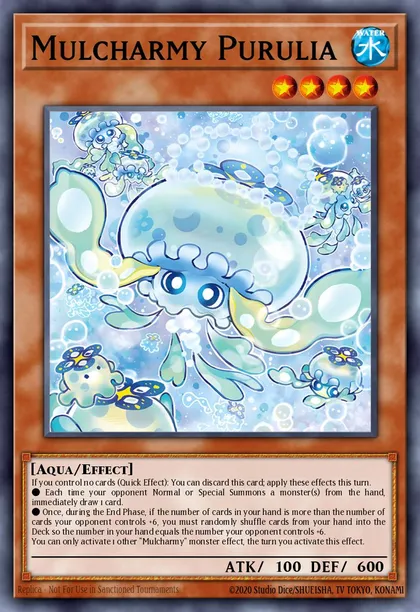
Purulia is the least effective Mulcharmy, only getting 1 draw when played around in most 1 card combos, and in 2 card combos, can be completely avoided to give 0 draws
Nauya + Habakiri, giving 0 draws and handripping (Replay)
Purulia doesn't draw off of setting monsters, this combo takes advantage of this.
-
Activate Habakiri to summon Aramasa and tribute it
-
Use Aramasa to search Saji
-
Activate Nauya to send it and Keurse to the GY
-
Set Saji
-
Tribute Saji to summon Keurse from the GY
-
CL 1 Saji to search Prayers, and CL 2 Keurse to summon Nauya out of the GY
-
Activate Nauya's effect to add Daybreak
-
Activate Daybreak tributing Keurse to summon 4 tokens
-
Use 2 tokens to make Link Spider then Haggard Lizardose
-
Banish Aramasa with Lizardose to draw a card
-
Activate Prayers, tributing Habakiri and use both effects, adding Murakumo and special summoning Saji from the GY
-
Make KOTFI with Saji and Nauya and add Zohah
-
Activate Ritual to summon Futsu from deck by tributing Murakumo
-
Activate Murakumo's tribute effect to add Mitsurugi Mirror
-
Link off Lizardose and a token for Unicorn, then make A Bao A Qu with Unicorn and the final token
-
Activate Mirror to Ritual summon Murakumo by tributing Futsu
-
Use Futsu's tribute effect to add either Prayers or Purification and summon it back
-
Send Aron from the deck to the GY with Daybreak's GY effect by shuffling back Aramasa
-
Use A Bao A Qu's effect to discard and special summon Zohah
-
Summon Aron by tributing Zohah and KOTFI
-
Use Zohah's effect to make your opponent draw and discard and lets you add Nephilabyss to hand and discard it
-
Activate Aron's effect to send a random card from the opponent's hand to the GY
-
Link off Aron and Murakumo for I:P set your added backrow, then in the end phase A Bao A Qu returns to the field
Endboard: I:P, Purification, Futsu, A Bao A Qu and Aron and Murakumo in GY, giving 0 draws and ripping 1 (Opponent starts with 5 cards).
Instead of handripping you want to end on both Mitsurugi backrow without giving a draw you can also do that, instead of adding Zohah in step 12, you can instead add Kusanagi and summon it with A Bao A Qu to add back Prayers.
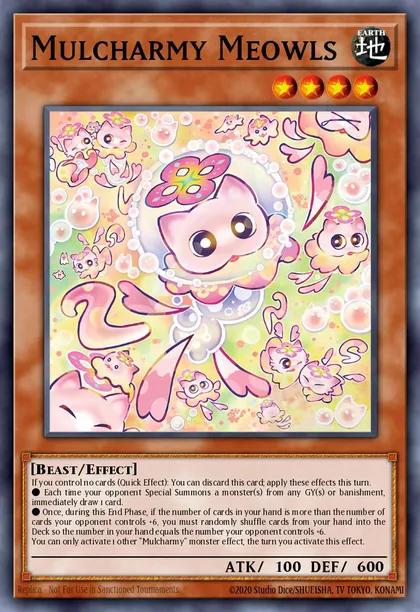
Meowls is good against hands which start with the foolish effect of Nauya but is mostly avoidable.
Nunu + Discard (Replay)
Endboard: Futsu, Prayers, Purification, I:P, Murakumo and Aron in GY, giving 3 draws and ripping 1 (Oppenent starts their turn with 7 cards)
Typically Meowls is held until it can get a guaranteed draw, so lines can vary depending on when your opponent uses it against a Habakiri start, for instance if not chained to Prayers, a draw can be avoided.
Habakiri(Replay)
Endboard: I:P, Prayers, Purification, with Futsu, Murakumo and Aron in GY, giving 2 draws and ripping 1 (Opponent starts their turn with 6 cards)
The Ogdoadic combos by themselves play awfully into Maxx "C", so it is preferable to not play into it at all. If you play Zer'oll you could try to take the challenge, but you'd just be hoping that your opponent doesn't draw into anything
Habakiri (Replay)
You can also summon Futsu for one additional draw if you'd like.
Endboard: Prayers + Murakumo, giving 2 draws (Oppenent starts their turn with 7 cards).
Habakiri + Access to Aron (Replay)
Endboard: Aron, Prayers, Murakumo in GY, Purification, giving 3 draws then ripping 1 (Oppenent starts their turn with 7 cards).
Nauya + Normal summon + Discard, first search Daybreak (Replay)
Endboard: I:P + A Bao A Qu
You can also do this board by opening Daybreak and getting an 8 on board
With Fiendsmith on Sequence, first search Daybreak (Replay)
Endboard: I:P, A Bao A Qu and Desirae/Ceasar
Habakiri (Replay)
Endboard: S:P or Dyna Mondo
No Ogdoadic combos work into Shifter, so you just gotta open Mitsurugi combo.
The plays into Shifter are all pretty bad, best case you are getting Prayers and Purification with Murakumo, but you can't pull that off with a one card combo
Habakiri (Replay)
Endboard Murakumo and Purification/Prayers
Habakiri + Daybreak(Replay)
Endboard: I:P, Murakumo, Prayers/Magatama and Purification
By opening a way to Daybreak, you can improve your board significantly.
Lancea stops Daybreak's foolish and LIzardose's draw, which can be annoying.
Nunu + Discard, Lanea used after searching Nauya (Replay)
Endboard: I:P or A Bao A Qu
Just Nunu and a discard has no way of getting a second level 4 after searching Nauya and then Daybreak, however has many ways of beating Lancea, by opnening any Reptile, any Mitsurugi starter, a Level 4, Water Lily or Daybreak.
Nunu + Discard, Lancea in the draw phase (Replay)
Endboard: I:P, Link 2-4(Ex. Dyna Mondo, S:P, A Bao A Qu), Aron, Futsu, Murakumo in GY, Prayers and Purifiaction
Starting with Habakiri results in the same combo
Retaliating "C" would be really easy to beat if Maxx "C" couldn't be searched, instead it is a little more awkward. Loading... , Loading... and Loading... are the best ways to deal with Retaliating "C" and prevent its search.
Nunu + 2 Discards (Replay)
Combos that start with Ogdoadic must use either Knightmare Unicorn or S:P to beat Retaliating "C", as there is no way to get a ritual monster in the GY for Dyna Mondo
Habakiri + 1 Discard (Replay)
Snake Rain + 2 Discads (Replay)